Agar-Agar for Homemade Whipped Cream
The Biggest Cream Charger Knowledge Base Online

Suppose you already have some bakery expertise and probably make enough whipped cream batches daily. In that case, you are undoubtedly familiar with Agar-Agar to prepare the homemade whipped cream. Other enthusiasts, who are still far from being experts, give us a moment to explain everything about Agar-Agar in detail.
This guide will uncover its use in cooking and excellent use as a substitute for gelatin.

What is Agar-Agar?
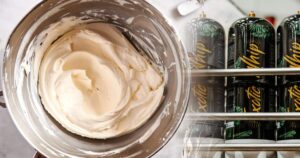
So if you ever tried homemade whipped cream and saw that it deflated quickly or became watery after a while, you surely missed a stabilizer. An additive you add to your mixture to prevent it from separating; to maintain emulsion intact. Agar-Agar is a stabilizer!
Agar-Agar is plant-based gelatin extracted from red algae, a type of seaweed; sold in flakes, bars, strands, and powder for cooking. This last calls our attention.
Being highly stabilizing, Agar-Agar is also known for its thickening effects. Even more known for the fact it is a vegetarian substitute for gelatin! Marvelous, isn’t it?
In Asia, for instance, it has been popular for centuries, so it is most likely to be used in all kinds of recipes. Some examples are sauces, mousses, jelly-based desserts, custards, and puddings. Moreover, it is completely odorless and tasteless, making it a perfect gelling agent for adding to whipped cream.
Agar-Agar VS. Gelatin
We uncovered the first defining fact of Agar-Agar: it is a vegan substitute. Clear! But what differentiates it from ordinary gelatin? Well, the place where they derive.
While we extract Agar-Agar from red algae, ordinary gelatin is animal-based, more clearly, from livestock collagen, name it cartilage, bones, skin, or tendons.
Additionally, both setting agents are different in incorporating them into our recipes. Agar-Agar, we need to simmer to form. The gelatin, on the contrary, dissolves in water. That is because Agar melts at 185 F (85 °C) and gelatin at 95 F (35 °C).
Agar-Agar also sets quicker than animal-based gelatin. It doesn’t need refrigeration either.
As a result, if you use Agar, you will have a more firm and healthy but less creamy and bouncy dish.
- An excellent additional tip is that Agar can be set at room temperature for that it will not melt at high temperatures. However, it is best to serve cold.
How to Use Agar-Agar in Powder for Homemade Whipped Cream
We mentioned that you could find Agar-Agar in the market in powder, bars, strands, or flakes. We also told you that the powdered form calls our attention the most. Let us tell you why: Powdered Agar is the most accessible form and certainly the easiest to use.
If used in powdered form, before adding it to any recipe:
The first step is to dissolve the powder in water and then simmer it at medium-high heat until slightly thickened. We can not simply dissolve in a liquid or add it directly to the food.
Once you add the dissolved Agar to a recipe, it will take approximately an hour to set at room temperature.
How much Agar-Agar to use in powder?
The average quantity for a 350 ml portion or below is one tablespoon of powdered Agar.
- For softer jelly or when using fruit pureé, use less Agar.
Stabilized Homemade Whipped Cream Recipe with Agar Agar
Before jumping straight into the recipe, you might wonder why stabilized whipped cream? Easy: it is a more firm type of whipped cream that holds its shape for longer.
So, what do we need to make it stabilized? Agar-Agar for sure. At least for this recipe.
Ingredients:
- Heavy Whipping Cream (1 cup) – with over 35% of fat content.
- Coldwater
- 3 tsp. Powdered sugar
- 1/2 tsp. Vanilla
- 1 tsp. Agar-Agar (Unflavored gelatin)
Important to know:
- Add the sugar when the cream is thickened, just before the soft peak stage. Preferably powdered sugar for a better end.
- Ensure all utensils are cold – When the cream is too warm, the fat loses its ability to stabilize with the air you’re whipping. To prevent it from deflating quickly after being beaten, put the bowl, whisk, and cream in the freezer for 20 minutes before you want to start. 5 to 10 minutes is also possible.
Tools:
- Bowls (Don’t forget to put it before in the freezer as instructed above)
- Whisk (or hand mixer)
- Vanilla extract
Indications:
Step 1: Chill your bowls and beaters – The colder your ingredients when you make your whipped cream, the quicker it will thicken, and it can even increase the volume of your whipped cream.
Step 2: Pour a few tablespoons of water into your bowl and sprinkle a teaspoon of gelatin. Let it sit for a few minutes.
Step 3: Place the bowl with gelatin in the microwave and warm it up for 1 to 5 seconds. Once you take it out, stir and set it somewhere to cool down.
Step 4: While the gelatin preparation is cooling, start making whipped cream—a simple mix of heavy whipping cream, powdered sugar, and vanilla extract. Make sure you create good soft peaks while beating the whipped cream.
Find out here How to Make the Perfect Whipped Cream at Home
Step 5: Is your soft peak on point? Pour the cooled gelatin mixture into your whipped cream and mix it well. If you use an electric hand mixer, pour the gelatin mix slowly to avoid lumps.
Step 6: Are you still beating and getting stiff peaks? Good news! You can now serve or pope it on your dessert!
- This whipped cream will hold up fine at room temperature for a couple of hours. Still, it’s best to keep your dessert refrigerated and avoid leaving it anywhere too warm for too long.
Are you excited for more? How to Make Flavored Whipped Cream is the next best thing you can try at home. Quick & easy!
Watch this video to find out another way to make stabilized homemade whipped cream.